

Spring子项目
Spring 事务传播行为
下表中有个词在这里说明一下:“当前事务”
当一个事务方法调用另一个事务方法时,前一个方法已经开启了事务,这个事务就会被认为是“当前事务”。
| 传播行为 | 描述 | 使用场景 |
|---|---|---|
| REQUIRED | Spring 中的默认事务传播行为,如果当前存在一个事务,则加入该事务;如果当前没有事务,则创建一个新的事务。 | 调用方有就加入事务,没有就新建,适用于大多数情况 |
| REQUIRES_NEW | 每次都创建一个新的事务。如果当前存在一个事务,则挂起当前事务(挂起过程中需等待新事务执行完成后才能继续)。 | 适用于需要完全独立的事务的操作,不管调用方是否有事务 |
| SUPPORTS | 如果当前存在一个事务,则加入该事务;如果当前没有事务,则以非事务方式执行。 | 不强制要求事务,可有可无 |
| NOT_SUPPORTED | 总是以非事务方式执行。如果当前存在一个事务,则挂起当前事务。 | 自身不需要事务支持 |
| MANDATORY | 如果当前存在一个事务,则加入该事务;如果当前没有事务,则抛出异常。 | 确保调用方必须有事务 |
| NEVER | 总是以非事务方式执行。如果当前存在一个事务,则抛出异常。 | 自身和调用方都明确不需要事务 |
| NESTED | 如果当前存在一个事务,则创建一个事务作为当前事务的嵌套事务来运行(使用保存点)。如果当前没有事务,则创建一个新的事务。 | 自身和调用放都独立处理各自事务,特别适用于复杂的业务操作 |
提示
传播行为定义在 org.springframework.transaction.annotation.Propagation 枚举中
propagation behavior [ˌprɒpə'ɡeɪʃ(ə)n] 传播行为
反应式 Spring
反应式编程
命令式编程
按照顺序逐一将代码编写为需要遵循的指令列表。在某项任务开始执行之后,程序在开始下一项任务之前需要等待当前任务完成
反应式编程
反应式编程本质上是函数式和声明式的。反应式编程不再描述一组依次执行的步骤,而是描述数据会流经的管道或流。反应式流不再要求将被处理的数据作为一个整体进行处理,而能够在数据可用时立即开始处理。实际上,传入的数据可能是无限的(比如某个地理位置的实时温度测量数据的恒定流)
提示
JDK 9 中的 Flow API 对应反应式流,其中的 Flow.Publisher、Flow.Subscriber、Flow. Subscription 和 Flow.Processor 类型分别直接映射到反应式流中的 Publisher、Subscriber、Subscription 和 Processor。也就是说,JDK 9 的 Flow API 并不是反应式流的实际实现(相当于接口)
反应式流规范
反应式流规范可以总结为 4 个接口,即 Publisher、Subscriber、Subscription 和 Processor。
// Publisher负责生成数据
// Subscriber可以通过调用其subscribe方法向Publisher发起订阅
public interface Publisher<T> {
  void subscribe(Subscriber<? super T> subscriber);
}
// Subscriber一旦订阅成功,就可以接收来自 Publisher 的事件 // 这些事件是通过 Subscriber 接口上的方法发送的 public interface Subscriber<T> { void onSubscribe(Subscription sub); void onNext(T item); void onError(Throwable ex); void onComplete(); }// Subscriber收到的第一个事件是通过对onSubscribe()方法的调用接收的 // Publisher调用onSubscribe()方法时,它将Subscription对象传递给Subscriber // 通过Subscription,Subscriber可以管理其订阅情况 // Subscriber可以通过多次调用request()方法来请求Publisher发送数据,也可以通过调用cancel()方法来表明它不再对数据感兴趣并且取消订阅。 public interface Subscription { void request(long n); // n表明它每次愿意接受多少数据;这也是回压能够发挥作用的地方——避免Publisher发送超过Subscriber处理能力的数据量 void cancel(); }// 至于Processor接口,它是Subscriber和Publisher的组合 // 当作为 Subscriber时,Processor会接收数据并以某种方式对数据进行处理。然后,它会将角色转变为Publisher,将处理的结果发布给它的Subscriber。 public interface Processor<T, R> extends Subscriber<T>, Publisher<R> {}
Reactor——反应式流的实现
Mono 和 Flux 是 Reactor 的两种核心类型,都实现了反应式流的 Publisher 接口;Flux 代表具有零个、一个或者多个(可能是无限个)数据项的管道,而 Mono 是一种特殊的反应式类型,针对数据项不超过一个的场景进行了优化。
<dependency>
  <groupId>io.projectreactor</groupId>
  <artifactId>reactor-core</artifactId>
</dependency>
<dependency>
  <groupId>io.projectreactor</groupId>
  <artifactId>reactor-test</artifactId>
  <scope>test</scope>
</dependency>
反应式流常见操作
常见操作大致可以分为四类: 创建操作、组合操作、转换操作、逻辑操作。
创建操作
根据对象创建
@Test
public void createAFlux_just() {
  Flux<String> fruitFlux = Flux.just("Apple", "Orange");
  // fruitFlux.subscribe(System.out::println)

  // 使用Reactor提供的StepVerifier测试Flux
  // StepVerifier将会订阅该反应式类型,在数据流过时对数据使用断言,并在最后验证反应式流是否按预期完成
  StepVerifier.create(fruitFlux)
    .expectNext("Apple")
    .expectNext("Orange")
    .verifyComplete();
}
根据集合创建
数组String[] fruits = new String[] { "Apple", "Orange" }; Flux<String> fruitFlux = Flux.fromArray(fruits); StepVerifier.create(fruitFlux) .expectNext("Apple") .expectNext("Orange") .verifyComplete();列表// 如果需要根据List、Set或者其他任意java.lang.Iterable的实现来创建Flux,那么可以将其传递给静态的fromIterable()方法 List<String> fruitList = new ArrayList<>(); fruitList.add("Apple"); fruitList.add("Orange") Flux<String> fruitFlux = Flux.fromIterable(fruitList); StepVerifier.create(fruitFlux) .expectNext("Apple") .expectNext("Orange") .verifyComplete();根据 Stream 创建
Stream<String> fruitStream =Stream.of("Apple", "Orange");
Flux<String> fruitFlux = Flux.fromStream(fruitStream);
...
其他创建示例
// 根据区间创建 (5个条目,即整数1到5)
Flux<Integer> intervalFlux = Flux.range(1, 5);
// 根据间隔时间发布创建(从0开始,后续每隔一秒递增)
Flux<Long> intervalFlux = Flux.interval(Duration.ofSeconds(1)).take(5);
组合操作
mergeWith 方法
mergeWith 方法不能完美地保证源 Flux 之间的先后顺序,下面演示如何按顺序交替合并两个 flux
Flux<String> characterFlux = Flux.just("cat", "dog ")
    .delayElements(Duration.ofMillis(500)); //每500毫秒发布一个条目
Flux<String> foodFlux = Flux.just("fish", "bone")
    .delaySubscription(Duration.ofMillis(250)) // 订阅后延迟250毫秒发布条目
    .delayElements(Duration.ofMillis(500));
Flux<String> mergedFlux = characterFlux.mergeWith(foodFlux);
StepVerifier.create(mergedFlux)
    .expectNext("cat")
    .expectNext("fish")
    .expectNext("dog")
    .expectNext("bone")
    .verifyComplete();
zip 方法
完美按顺序对齐,且可以使用合并函数,灵活性更高
- 不使用合并函数
Flux<String> characterFlux = Flux.just("cat", "dog"); Flux<String> foodFlux = Flux.just("fish", "bone"); Flux<Tuple2<String, String>> zippedFlux = Flux.zip(characterFlux, foodFlux); StepVerifier.create(zippedFlux) .expectNextMatches(p -> p.getT1().equals("cat") && p.getT2().equals("fish")) .expectNextMatches(p -> p.getT1().equals("dog") && p.getT2().equals("bone")) .verifyComplete();- 使用合并函数
Flux<String> characterFlux = Flux.just("cat", "dog");
Flux<String> foodFlux = Flux.just("fish", "bone");
Flux<Tuple2<String, String>> zippedFlux = Flux
  .zip(characterFlux, foodFlux, (c, f) -> c + "eat" + f );
...
转换操作
基本操作
// 跳过前两个
Flux<String> countFlux = Flux.just("one", "two", "three").skip(2);
// 跳过前两秒发布的数据
Flux<String> countFlux = Flux.just("one", "two", "three")
  .delayElements(Duration.ofSeconds(1)).skip(Duration.ofSeconds(2));
// 获取前两个
Flux<String> countFlux = Flux.just("one", "two", "three").take(2);
// 筛选数据
Flux<String> countFlux = Flux.just("one", "two", "three")
  .filter(n -> n.contains("e"));
// 去重
Flux<String> countFlux = Flux.just("one","one", "two", "three").distinct();
映射、缓存
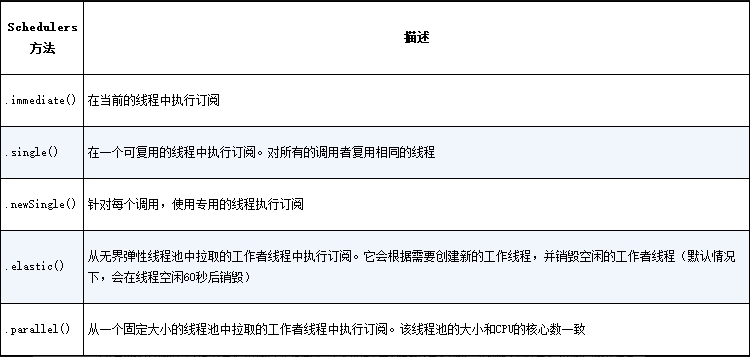
// 映射map()操作是同步执行的,如果想要执行异步的转换操作,那么应该考虑使用flatMap()操作
Flux<String> countFlux = Flux.just("one_", "two_", "three_")
  .map(n -> n.substring(0, n.length() - 1));
// flatMap()并不像map()操作那样简单地将一个对象转换到另一个对象,而是将对象转换为新的Mono或Flux
// 结果形成的Mono或Flux会扁平化为新的Flux。当与subscribeOn()方法结合使用时,flatMap()操作可以释放Reactor反应式的异步能力
Flux<String> countFlux = Flux.just("one_", "two_", "three_")
  .flatMap(n -> Mono.just(n).map(p -> p.substring(0, n.length() - 1))
    .subscribeOn(Schedulers.parallel())); // 指定并发模型,详情见下图

// 缓冲数据 buffer配合flatMap可以并行处理每个集合
Flux<String> countFlux = Flux.just("one", "two", "three", "four");
Flux<List<String>> bufferedFlux = countFlux.buffer(3); // 每三个缓存为一组
bufferedFlux.flatMap(x -> Flux.fromIterable(x)
          .map(y -> y.toUpperCase())
          .subscribeOn(Schedulers.parallel())
          .log() // 控制台观察实际发生了什么
      ).subscribe();
提示
Schedulers 支持的并发模型
将数据收集到 map 中
// 将数据收集到map中
Flux<String> countFlux = Flux.just("one", "two", "three");
Mono<Map<Character, String>> countMapMono = countFlux.collectMap(a -> a.charAt(0));
StepVerifier.create(countMapMono)
        .expectNextMatches(map -> {
          return map.size() == 2 &&
              map.get('o').equals("one") &&
              map.get('t').equals("three");
  }).verifyComplete();
逻辑操作
Flux<String> countFlux = Flux.just("one", "two", "three");
Mono<Boolean> hasOMono = countFlux.all( n -> n.contains("o")); // false
Mono<Boolean> hasOMono = countFlux.any( n -> n.contains("o")); // true
订阅
Flux.just("test")
      .timeout(Duration.ofSeconds(1)) // 如果数据在1秒内未返回,则执行错误处理器
      .subscribe(
        i-> {...},  // 未超时执行
        e -> {...} // 错误处理
      );
Spring WebFlux
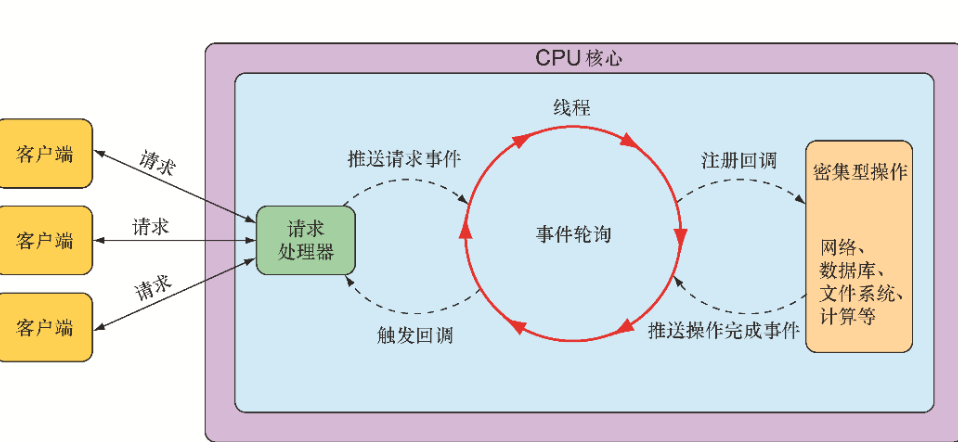
Spring MVC,本质上都是阻塞式和多线程的,每个连接都会使用一个线程。在请求处理的时候,会在线程池中拉取一个工作者(worker)线程来对请求进行处理。同时,请求线程是阻塞的,直到工作者线程提示它已经完成。
相比之下,异步 Web 框架能够以更少的线程获得更高的可扩展性,通常它们只需要与 CPU 核心数量相同的线程。通过使用所谓的事件轮询(event looping)
WebFlux 默认嵌入的服务器是 Netty 而不是 Tomcat
<dependency>
  <groupId>org.springframework.boot</groupId>
  <artifactId>spring-boot-starter-webflux</artifactId>
</dependency>
反应式控制器示例
基于注解
// get
@GetMapping("recent/{id}")
public Flux<String> recent(@PathVariable("id") Long id) {
  return myFluxService.findAll().take(12);
}
// post
@PostMapping(consumes = "application/json")
@ResponseStatus(HttpStatus.CREATED)
public Mono<User> post(@RequestBody User user) {
  return userRepo.save(user);
}
基于函数
使用 Spring 的函数式编程模型编写 API 会涉及 4
● RequestPredicate,声明要处理的请求类型(请求路径、方式等);
● RouterFunction,声明如何将请求路由到处理器代码中;
● ServerRequest,代表一个 HTTP 请求,包括对请求头和请求体的访问;
● ServerResponse,代表一个 HTTP 响应,包括响应头和响应体信息。
Get 请求
import static org.springframework.web
                .reactive.function.server.RequestPredicates.GET;
import static org.springframework.web
                .reactive.function.server.RouterFunctions.route;
import static org.springframework.web
                .reactive.function.server.ServerResponse.ok;
import org.springframework.web.reactive.function.server.RouterFunction;
...

@Configuration
public class RouterFunctionConfig {
  @Bean
  public RouterFunction<?> helloRouterFunction() {
    return route(
             GET("/hello").and(queryParam("name",n-> n!=null)), // 参数条件
             this::hello    // 响应
           );
   }
   public Mono<ServerResponse> hello(ServerRequest request) {
       return ServerResponse.ok()
                 .body(just("Hello " + request.queryParam("name").get()), String.class)
   }
}
Post 请求
@Bean
public RouterFunction<?> helloRouterFunction() {
 return route(POST("/hello1"), this::hello)
           .andRoute(POST("/hello2"), this::hello)  // 声明多个路由
           .andRoute(POST("/hello3"), this::hello);
}
public Mono<ServerResponse> hello(ServerRequest request) {
   return request.bodyToMono(User.class)
                 .flatMap(user -> userFluxService.save(user))
                 .flatMap(savedUser -> ServerResponse.ok().body(savedUser, User.class))
}
使用 WebClient 消费反应式 Api
WebClient 作为 Spring WebFlux 的一部分, 不需要再额外添加依赖
简单示例
Mono<User> monoUser = WebClient.create()
  .get()
  .uri("http://localhost:8080/user/{id}", userId)
  .retrieve() // 执行请求
  .bodyToMono(User.class);
monoUser.subscribe(i -> { ... });
配置
配置使用一个通用的基础 URI,即通用的 ip + 端口
@Bean
public WebClient webClient() {
  return WebClient.create("http://localhost:8080");
}
请求示例
GET
@Autowired
 WebClient webClient;

 public Mono<User> getUserById(String userId) {
   Mono<User> user = webClient
     .get()
     .uri("/users/{id}", userId)
     .retrieve()
     .bodyToMono(User.class);

   user.timeout(Duration.ofSeconds(1))
       .subscribe(i -> { ... },e -> { ... });
 }
POST
public Mono<User> getUserById(Mono<User> user) {
   Mono<User> user = webClient
     .post()
     .uri("/user/edit")
     .body(user, User.class)  // 请求体
     .retrieve()
     .bodyToMono(User.class);

   user.timeout(Duration.ofSeconds(1))
       .subscribe(i -> { ... },e -> { ... });
 }
RSocket
依赖
<dependency>
    <groupId>org.springframework.boot</groupId>
    <artifactId>spring-boot-starter-rsocket</artifactId>
</dependency>
服务端配置
spring.rsocket.server.port 属性有两个作用:
- 启用服务器(将本应用作为服务端);
- 指定服务器需要监听的端口;
# 如果没有设置该属性,那么 Spring 将认为该应用只作为客户端,没有服务器端口需要被监听
spring:
  rsocket:
    server:
      port: 7000
客户端配置
RSocket 客户端是通过 RSocketRequester 实现的
@Configuration
@Slf4j
public class RSocketClientConfiguration {
  @Bean
  public ApplicationRunner sender(RSocketRequester.Builder requesterBuilder)
     {
    return args -> {
      RSocketRequester tcp = requesterBuilder.tcp("localhost", 7000);
      // ... send messages with RSocketRequester ...
    };
  }
}
简介
RSocket 提供了应用程序之间的异步通信(默认是通过 TCP ),支持 Flux 和 Mono 等反应式模型。作为 HTTP 协议通信的替代方案,RSocket 更加灵活,提供了 4 种不同的通信模式:请求-响应(request-response)、请求-流(request-stream)、即发即忘(fire-and-forget)和通道(channel)。
请求-响应(request-response)
它模仿了典型的 HTTP 通信方式;客户端向服务器发出单一请求,而服务器则以单一响应来回应(Mono); RSocket 本质上是非阻塞且基于反应式类型的模型; 虽然客户端仍然会等待服务器的响应,但在“幕后”,一切都是非阻塞和反应式的,这样可以更高效地利用线程;
@Controller
@Slf4j
public class GreetingController {

    @MessageMapping("greeting/{name}")
    public Mono<String> handleGreeting(
        @DestinationVariable("name") String name,
        Mono<String> greetingMono) {
        return greetingMono
            .doOnNext(greeting ->
                log.info("Received a greeting from {} : {}", name, greeting))
            .map(greeting -> "Hello back to you!");
    }
}RSocketRequester tcp = requesterBuilder.tcp("localhost", 7000);
tcp
//.route("greeting")
.route("greeting/{name}","zjx")
.data("Hello RSocket!")
.retrieveMono(String.class)
.subscribe(response -> log.info("Got a response: {}", response));请求-流(request-stream)
请求-流通信模型与请求-响应类似,但客户端向服务器发送了一个请求后,服务器会以流的方式响应,流中可以包含若干值(Flux)
@Controller
@Slf4j
public class GreetingController {
    // 模拟每秒向客户端发送一个随机数字
    @MessageMapping("greeting/{name}")
    public Flux<String> handleGreeting(
        @DestinationVariable("name") String name) {
        return Flux
			.interval(Duration.ofSeconds(1))
			.map(i ->  return Math.random() );
    }
}
RSocketRequester tcp = requesterBuilder.tcp("localhost", 7000);
tcp
    .route("greeting/{name}", "zjx")
    .retrieveFlux(Double.class)
    .doOnNext(i ->
        log.info("greeting of {} ",Double.toString(i)))
    .subscribe();
即发即忘(fire-and-forget)
客户端可能需要向服务器发送数据,但不需要响应结果
@Controller
@Slf4j
public class GreetingController {
    // 模拟每秒向客户端发送一个随机数字
    @MessageMapping("greeting")
    public Mono<Void> handleGreeting(Mono<String> mono) {
        return mono
			.doOnNext(i -> {log.info("receive from client {} ", i })
			.thenEmpty(Mono.empty());
    }
}RSocketRequester tcp = requesterBuilder.tcp("localhost", 7000);
tcp
.route("greeting")
.data("zjx")
.send()
.subscribe();通道(channel)
在通道模型中,客户端与服务器之间会打开一个双向信道,双方都可以在任何时间向对方发送数据
@Controller
@Slf4j
public class GreetingController {
    // 模拟每秒向客户端发送一个随机数字
    @MessageMapping("greeting")
    public Flux<String> handleGreeting(Flux<String> data) {
        return data
			.doOnNext(i -> log.info("receive from client {} ", i))
			.map(i -> i + "has received !" );
    }
}RSocketRequester tcp = requesterBuilder.tcp("localhost", 7000);
Flux<String> data = Flux.fromArray(new String[]{"one", "two", "three", "four", "five"})
.delayElements(Duration.ofSeconds(1));
tcp
.route("greeting")
.data(data)
.retrieveFlux(String.class)
.subscribe(i -> log.info("receive from server {} ", i));通过 WebSocket 传输 RSocket
RSocket 通信是通过 TCP 套接字进行的,若客户端是采用 http 协议的 JavaScript 编写,可以将 RSocket 构建在 WebSocket 之上,以达到通讯目的;
依赖
由于 WebSocket 是通过 HTTP 传输的,需要确保服务器端的应用支持处理 HTTP 请求。简单地说,需要在项目的构建文件中添加以下 WebFlux starter 依赖(如果还没有添加)
<dependency>
  <groupId>org.springframework.boot</groupId>
  <artifactId>spring-boot-starter-webflux</artifactId>
</dependency>
配置
通过设置 spring.rsocket.server.mapping-path 属性以配置 RSocket 通信时所使用的 HTTP 路径
spring:
  rsocket:
      server:
          transport: websocket
          mapping-path: /rsocket
提示
以上是在服务器端为 RSocket 启用 WebSocket 传输要做的一些特殊工作,其他工作与 TCP 方式完全相同
- 客户端
import { getSocket } from "@/utils/socket.js";
getSocket("ws://localhost:8080/rsocket", "Hello RSocket!", (data, ws) => {
  // 保存数据对象, 以便发送消息
  console.log(data);
  this.wsData = ws; // 当前WebSocket实例
});RSocketRequester requester = requesterBuilder.websocket(
URI.create("ws://localhost:8080/rsocket"));
requester
.route("greeting")
.data("Hello RSocket!")
.retrieveMono(String.class)
.subscribe(response -> log.info("Got a response: {}", response));Spring Boot Actuator
Actuator 提供了生产环境可用的特性,包括可以监控 Spring Boot 应用和获取它的各种指标。如下:
- 在应用环境中,都有哪些可用的配置属性?
- 在应用中,各个源码包的日志级别是什么?
- 应用消耗了多少内存?
- 给定的 HTTP 端点被请求了多少次?
- 应用本身以及与它协作的外部服务的健康状况如何?
依赖
<dependency>
  <groupId>org.springframework.boot</groupId>
  <artifactId>spring-boot-starter-actuator</artifactId>
</dependency>
配置
management:
  endpoints:
    web:
      # 修改基础路径;默认基础路径都会带有“/actuator”前缀
      base-path: /management
      exposure:
        include: "*" # 暴露的端点
        exclude: threaddump,heapdump # 排除的端点
    info: # 设置info节点响应内容
      my-contact:
        email: support@tacocloud.com
        phone: 822-625-6831
    health: # 健康指示器的完整细节(默认值是never)
      show-details: always
端点
Actuator starter 添加到项目的构建文件中后,应用就会具备一些“开箱即用”的 Actuator 端点,其中一部分如表所示
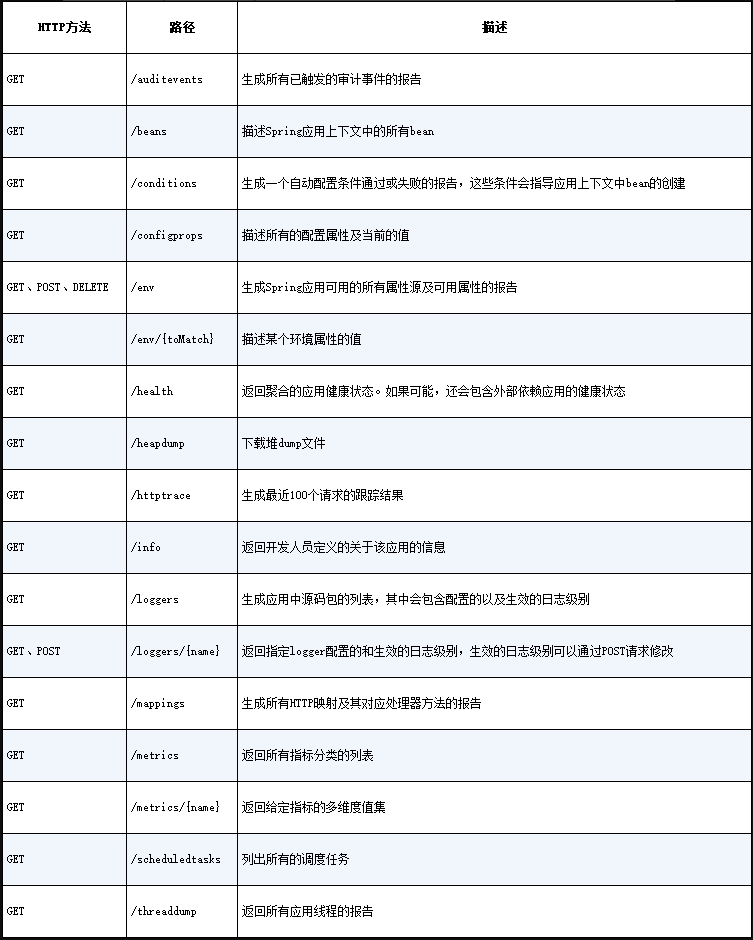
Actuator 端点
自定义为 info 端点提供信息示例
假设我们想要为“/info”端点添加自定义信息,需要编写一个实现 InfoContributor 接口的类
@Component
public class MyContributor implements InfoContributor {
  @Override
  public void contribute(Builder builder) {
    Map<String, Object> myInfo = new HashMap<String, Object>();
    myInfo.put("硬盘", "500T");
    myInfo.put("cpu核心数", 32);
    builder.withDetail("my-info", myInfo);
  }
}
内置 info 端点插件示例
- 注入构建信息到 info 端点示例
<build>
  <plugins>
    <plugin>
      <groupId>org.springframework.boot</groupId>
      <artifactId>spring-boot-maven-plugin</artifactId>
      <executions>
        <execution>
          <goals>
            <goal>build-info</goal>
          </goals>
        </execution>
      </executions>
    </plugin>
  </plugins>
</build>springBoot {
buildInfo()
}// 访问 localhost:8080/actuator/info ,响应结果如下
{
"build": {
"artifact": "tacocloud",
"name": "taco-cloud",
"time": "2021-08-08T23:55:16.379Z",
"version": "0.0.15-SNAPSHOT",
"group": "sia"
},
}- 暴露 Git 提交信息到 info
<build>
  <plugins>
...
    <plugin>
      <groupId>pl.project13.maven</groupId>
      <artifactId>git-commit-id-plugin</artifactId>
      <configuration>
        <!-- 若没有提交信息,忽略缺失的元素 -->
        <failOnNoGitDirectory>false</failOnNoGitDirectory>
      </configuration>
    </plugin>
  </plugins>
</build>plugins {
id "com.gorylenko.gradle-git-properties" version "2.3.1"
}// 访问 localhost:8080/actuator/info ,响应结果如下
{
"git": {
"branch": "main",
"commit": {
"id": "df45505",
"time": "2021-08-08T21:51:12Z"
}
},
...
}提示
我们还可以将 management. info.git.mode 属性设置为 full,从而得到项目构建时的详细 Git 提交信息(如提交人、提交消息等等)
management:
  info:
    git:
      mode: full
自定义健康端点指标示例
创建自定义的健康指示器,我们需要创建一个实现了 HealthIndicator 接口的 bean
@Component
public class MyHealthIndicator implements HealthIndicator {
  @Override
  public Health health() {
    return Health
        .up()
        .withDetail("CPU Temperature", "80")
        .withDetail("firewall", "All is good!")
        .build();
  }
}
自定义端点示例
Actuator 端点的定义与控制器有很大的差异。Actuator 端点并不使用@Controller 或@RestController 注解来标注类,而是为类添加@Endpoint 注解
另外,Actuator 端点的操作不使用 HTTP 方法命名的注解,如@GetMapping、@PostMapping、@DeleteMapping 等。它们是通过为方法添加@ReadOperation、@WriteOperation 和@DeleteOperation 注解实现的。这些注解并没有指明任何的通信机制。实际上,它们允许 Actuator 与各种各样的通信机制协作,内置了对 HTTP 和 JMX 的支持
@Component
@Endpoint(id = "my-test", enableByDefault = true) // //设置端点,并选择是否默认开启
// @Endpoint 注解还会暴露为MBean,使得我们可以使用任意的JMX客户端访问;如果只想暴露HTTP端点,可以使用@WebEndpoint注解
//  @WebEndpoint(id = "notes", enableByDefault = true)
public class MyTestEndpoint {

  private List<String> test = new ArrayList<>();

  // 按照HTTP的术语,它会处理针对“/actuator/my-test”的HTTP GET请求,并返回JSON格式的列表
  @ReadOperation
  public List<String> myGet() {
    return test;
  }

  // 按照HTTP的术语,它处理POST请求,请求体中是一个包含text属性的JSON对象
  @WriteOperation
  public List<String> myPost(String text) {
    test.add(text);
    return test;
  }

  // 按照HTTP的术语,它会处理DELETE请求
  @DeleteOperation
  public List<String> myDelete(int index) {
    if (index < test.size()) {
      test.remove(index);
    }
    return test;
  }
}
保护 Actuator
我们可能不想让别人窥探 Actuator 暴露的信息。此外,因为 Actuator 提供了一些用于修改环境变量和日志级别的操作,所以最好对 Actuator 进行保护;
可以使用 Spring Security 来保护 Actuator,重写 WebSecurityConfigurerAdapter 的 configure()方法即可;
@Override
protected void configure(HttpSecurity http) throws Exception {
  http
    .authorizeRequests()
      .antMatchers("/actuator/**")
      .hasRole("ADMIN")
    .and()
      .httpBasic();
}

// 以下是非硬编码写法
@Override
protected void configure(HttpSecurity http) throws Exception {
  http
    .requestMatcher(EndpointRequest.toAnyEndpoint())
    // .requestMatcher(EndpointRequest.to("beans", "threaddump", "loggers"))
        .authorizeRequests()
        .anyRequest().hasRole("ADMIN")
    .and()
      .httpBasic();
}
Spring Boot Admin
Spring Boot Admin 是一款管理类的 Web 前端应用,它可以使得 Actuator 的端点更易于使用。它分为两个主要的组件:Spring Boot Admin 服务器和其客户端
服务端:负责收集并展现 Actuator 数据
客户端:一个或多个 Spring Boot 应用
创建 Admin 服务器
创建一个新的 Spring Boot 应用
<dependency>
  <groupId>de.codecentric</groupId>
  <artifactId>spring-boot-admin-starter-server</artifactId>
</dependency>server:
port: 9090import de.codecentric.boot.admin.server.config.EnableAdminServer;
@EnableAdminServer
@SpringBootApplication
public class AdminServerApplication {
public static void main(String[] args) {
SpringApplication.run(AdminServerApplication.class, args);
}
}注册客户端
有两种方式注册 Spring Boot Admin 客户端:
- 每个 Spring Boot 应用显式向 Admin 服务器注册自身(本节概述);
- Admin 通过 Eureka 服务注册中心发现服务。 详情
应用注册客户端
<dependency>
  <groupId>de.codecentric</groupId>
  <artifactId>spring-boot-admin-starter-client</artifactId>
</dependency>
spring: application: name: my-cloud boot: admin: client: url: http://localhost:9090
部署 Spring Boot
使用 Dockerfile 构建镜像
FROM openjdk:11.0.12-jre
ARG JAR_FILE = target/*.jar
COPY ${JAR_FILE} app.jar
ENTRYPOINT ["java","-jar","/app.jar"]
$ docker build . -t xxxName $ docker run -p8080:8080 xxxNameMaven 或 Gradle 插件构建镜像
Maven$ mvnw spring-boot:build-image \ -Dspring-boot.build-image.imageName = xxxName $ docker push xxxName $ docker run -p8080:8080 xxxNameGradle$ gradlew bootBuildImage --imageName = xxxName $ docker push xxxName $ docker run -p8080:8080 xxxName